Running Pipeline
CI Pipeline
Continuous Integration is a pipeline which consists of steps required to create a packaged artifact which can then be used to run an application.
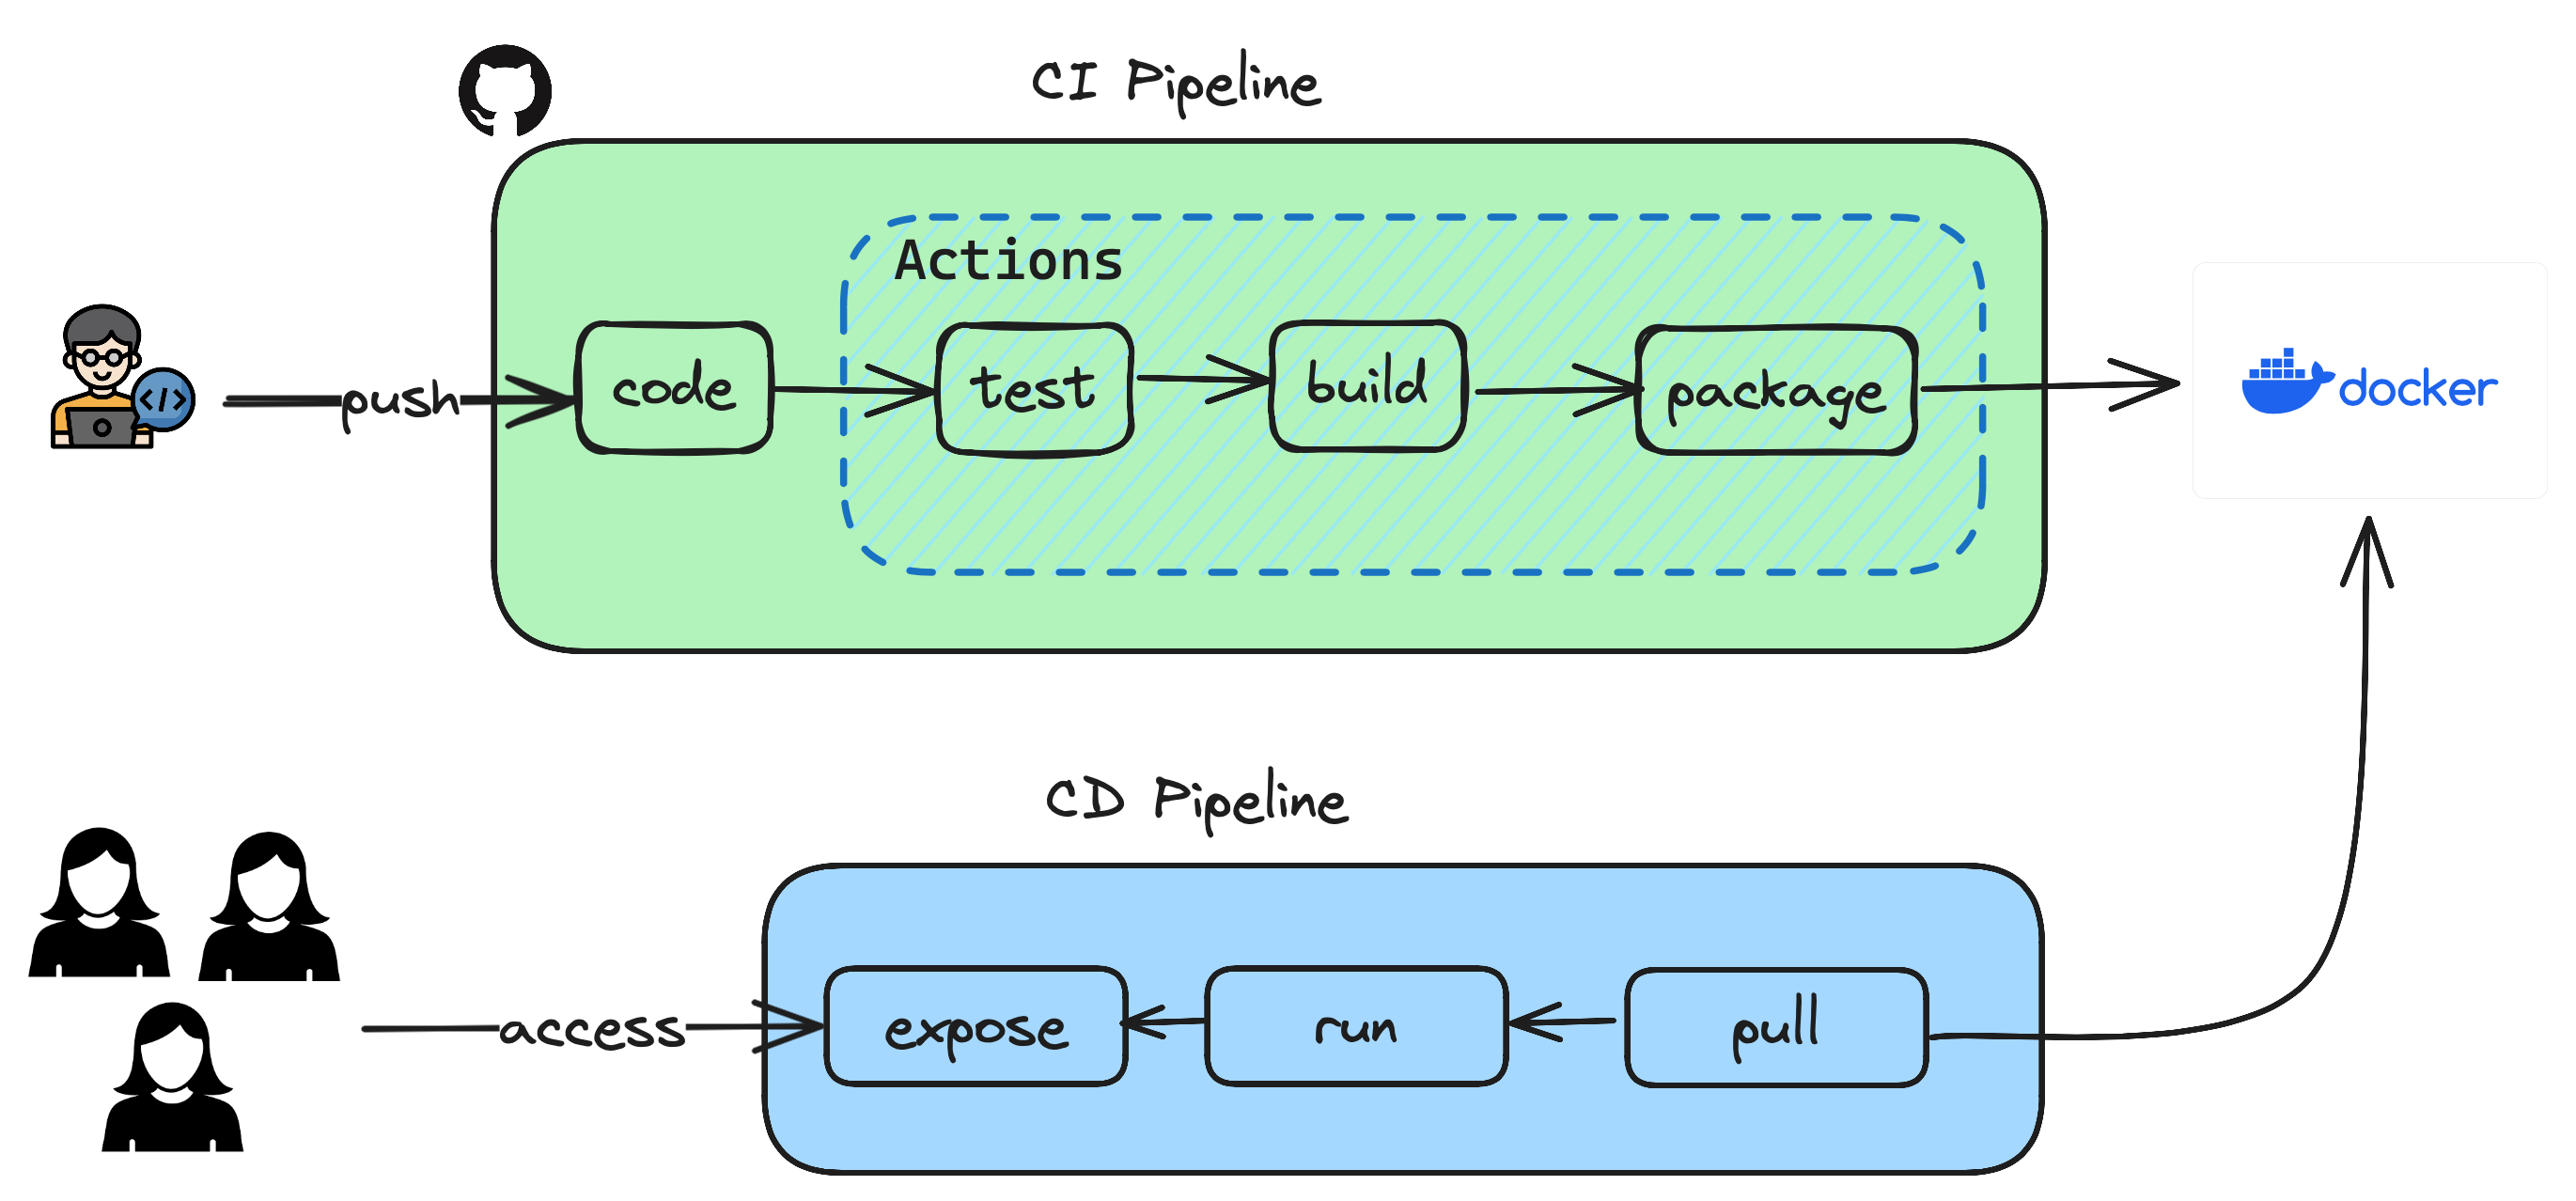
Previously you have created an API using springboot and have executed steps manually which resulted in testing, building and packaging as a container to be used. Let's see how those steps can be automated so that it all happens in a click of button or even better when pushing a code to repository.
- Open the GitHub repository and goto your repo which contains the Java application using springboot.
- Goto
Settingstab andSecuritysection where you can seeSecrets and Variablesand click on Actions. - Based on the pipeline depicted above, the only external integration you have is to use Docker where you maintain the container images which are built using
Dockerfileyou already have. - You create two variables
DOCKERHUB_TOKENandDOCKERHUB_USERNAMEas secrets so that you dont have to hardcode these secrets in your sourcecode. - In order to get the
DOCKERHUB_TOKENyou login to your DockerHub. GotoMyAccount->Securityand then createNew Access Tokenwith permissionsRead & Write. This will give the token access to read and write to your repository in DockerHub. - Copy the token and create the GitHub Secret
DOCKERHUB_TOKEN - For
DOCKERHUB_USERNAME, use your login username. - Once the secrets are created, GitHub Actions now has the permission to write the images to your repository. You will use these values in your workflow.
- Either from your local laptop or any terminal create the following directory structure and files and copy paste the code given below to your
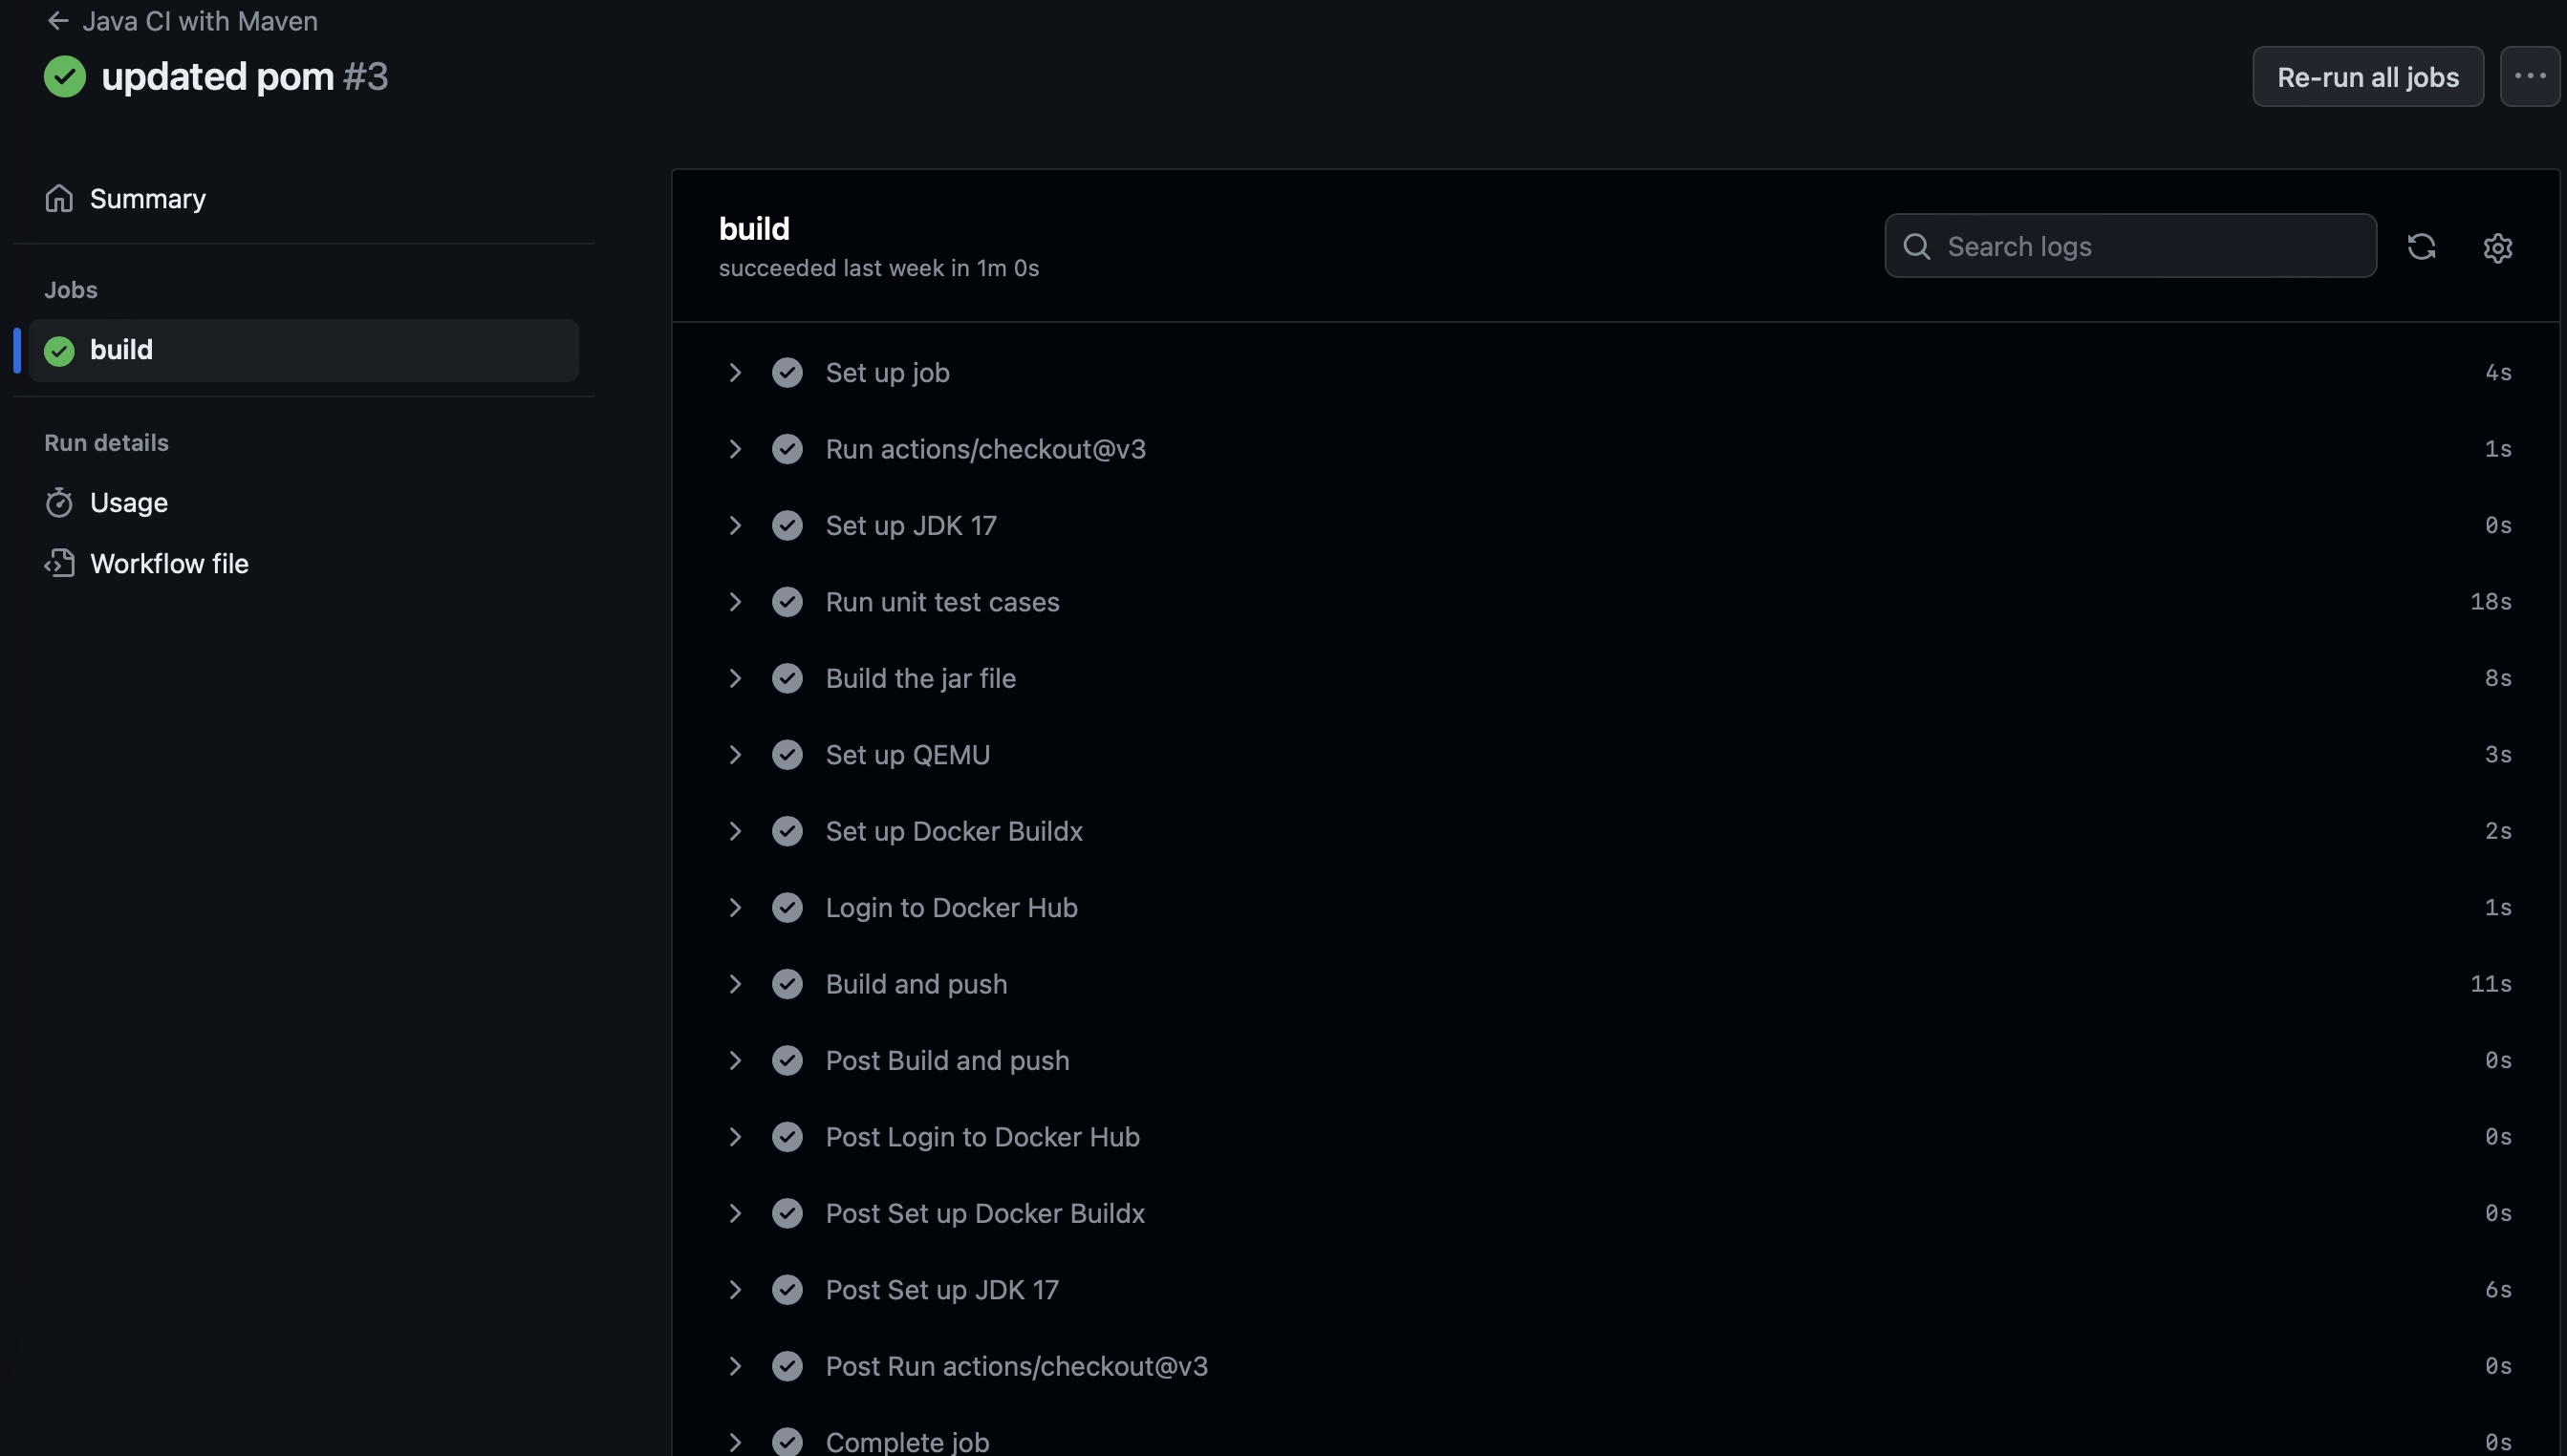
maven.yml
.github
└── workflows
└── maven.yml# This workflow will build a Java project with Maven, and cache/restore any dependencies to improve the workflow execution time
name: Java CI with Maven
on:
push:
branches: [ "main" ]
pull_request:
branches: [ "main" ]
jobs:
build:
runs-on: ubuntu-latest
steps:
- uses: actions/checkout@v3
- name: Set up JDK 17
uses: actions/setup-java@v3
with:
java-version: '17'
distribution: 'temurin'
cache: maven
- name: Run unit test cases
run: mvn test
- name: Build the jar file
run: mvn package
- name: Set up QEMU
uses: docker/setup-qemu-action@v3
- name: Set up Docker Buildx
uses: docker/setup-buildx-action@v3
- name: Login to Docker Hub
uses: docker/login-action@v3
with:
username: ${{ secrets.DOCKERHUB_USERNAME }}
password: ${{ secrets.DOCKERHUB_TOKEN }}
- name: Build and push
uses: docker/build-push-action@v5
with:
context: .
push: true
tags: ${{ secrets.DOCKERHUB_USERNAME }}/spring-rest-api:latest- Now you commit your changes
git add . && git commit -m "added github actions"and pushgit pushthis to your repository. Once the change is pushed goto yourActionstab on the repository and see the magic happening.
Caution
Everytime you push a code to main branch, the build will be triggered and new version of image will be pushed to docker hub.
CD Pipeline
Continuous Deployment is the process of sending the changes you made to your users immediately so that it can bring value to your business. For simplicity of deployment, you are going to build and deploy your website to S3 bucket.
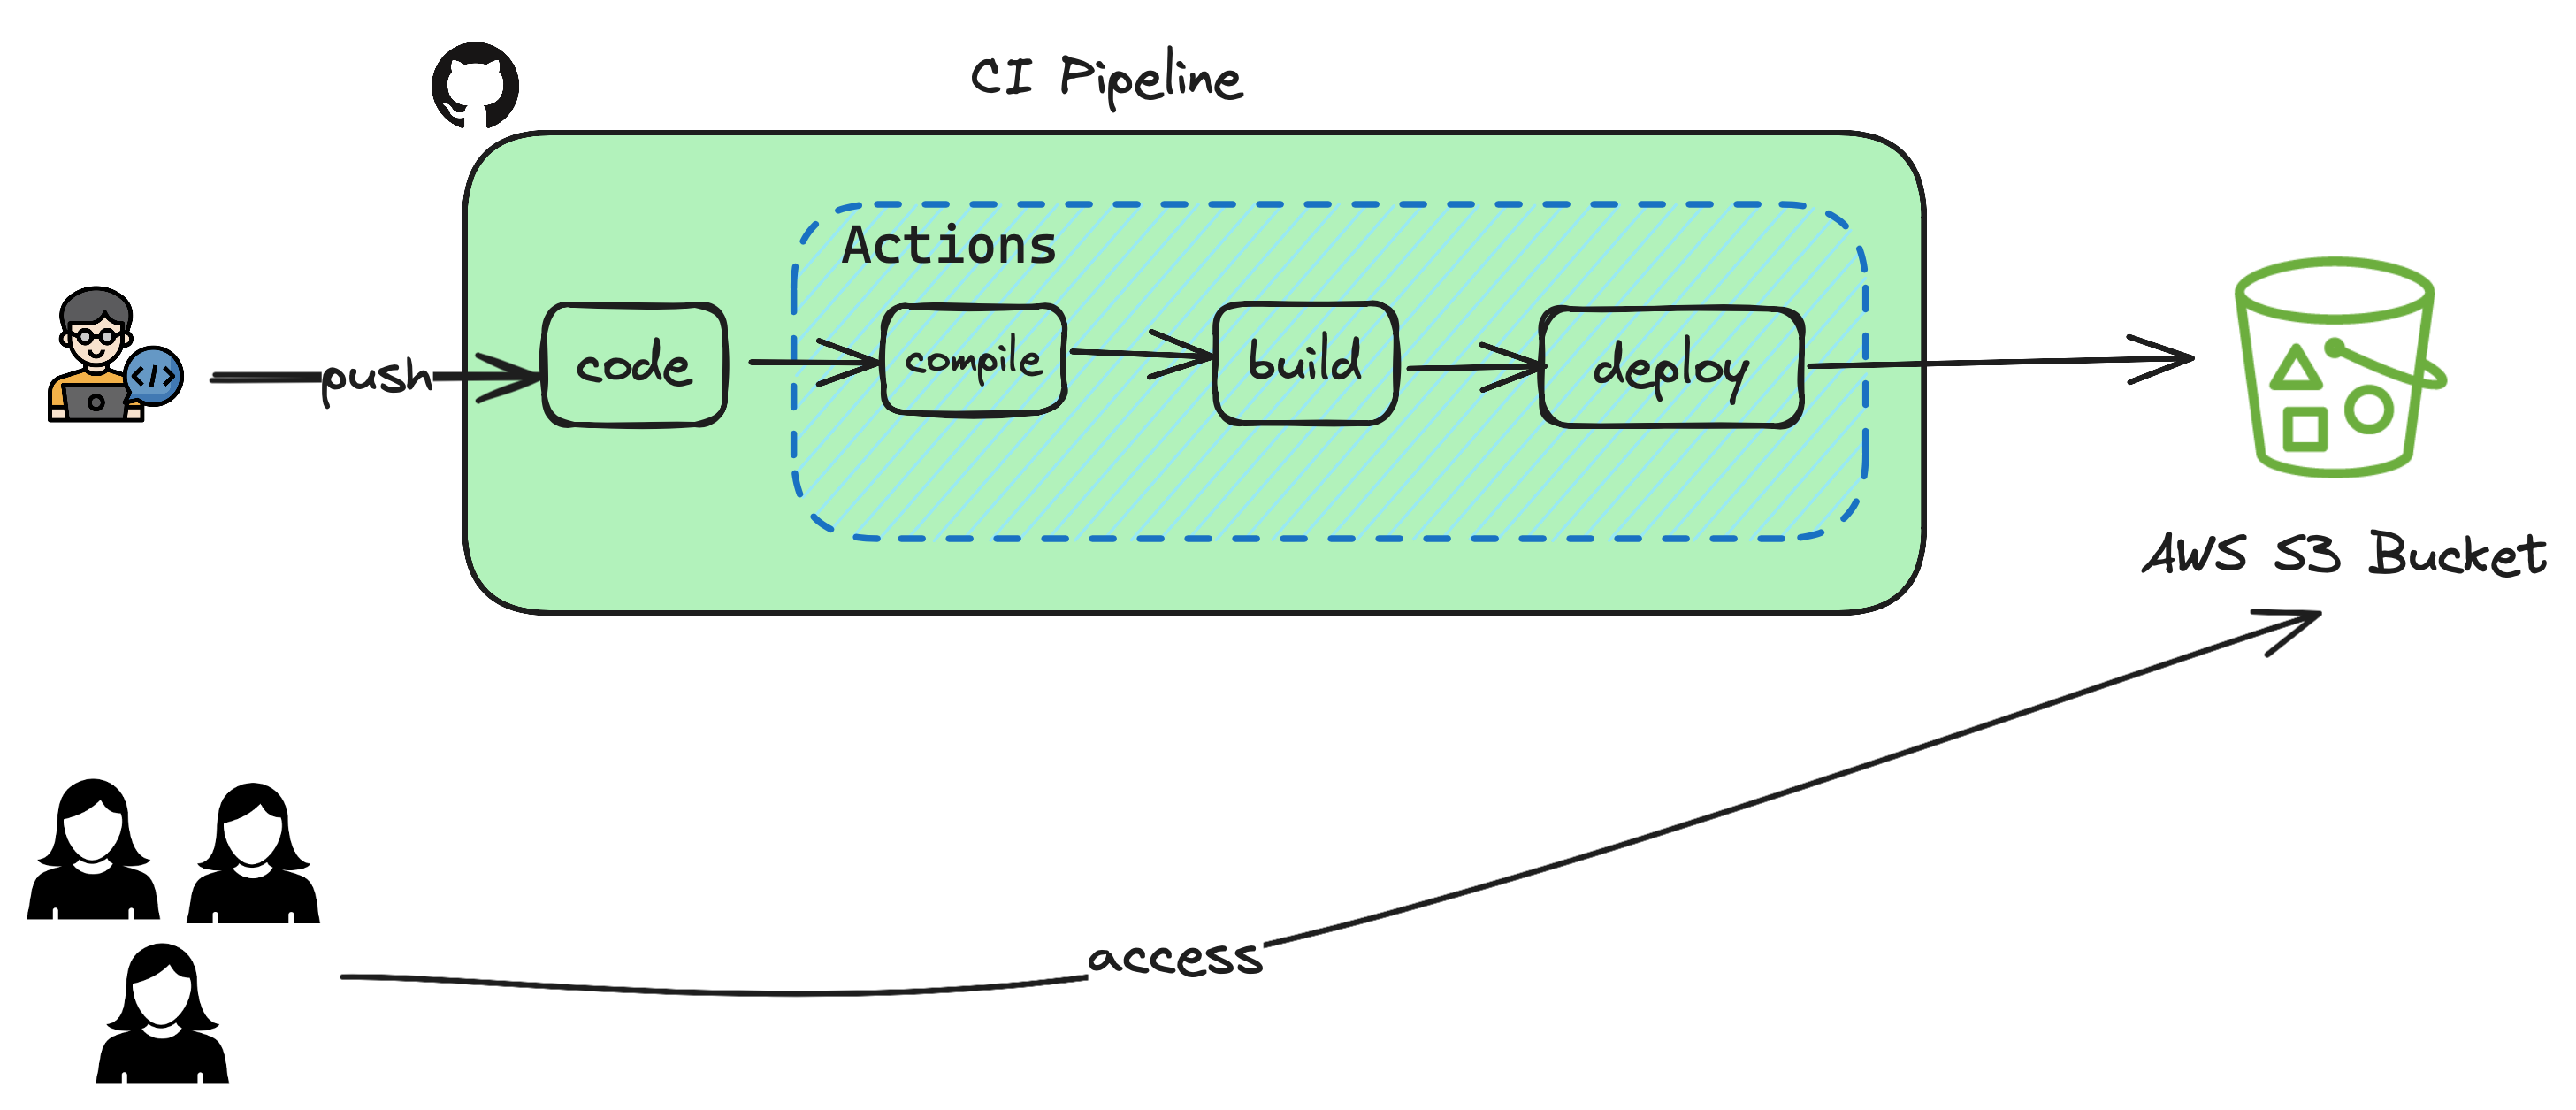
- Open the GitHub repository and goto your repo which contains the website using react/next js.
- Goto
Settingstab andSecuritysection where you can seeSecrets and Variablesand click on Actions. - Based on the pipeline depicted above, the only external integration you have is to use AWS S3 where you maintain the compiled static webpages and expose it over URL.
- You create two variables
AWS_ACCESS_KEY_IDandAWS_SECRET_ACCESS_KEYas secrets so that you dont have to hardcode these secrets in your sourcecode. - In order to get the AWS Credentials, login to your AWS Console using your user account
myuser. - Goto
IAM Console, click on your useridmyuserand then navigate toSecurity Credentialstab. UnderAccess Keyssection click onCreate access key. - Copy the access key ID and create the GitHub Secret
AWS_ACCESS_KEY_ID, copy access key secret and createAWS_SECRET_ACCESS_KEYand copy the bucket name and createAWS_S3_BUCKET_NAME - These credentials can be used in place of your userid/password to allow your user to perform any actions given in your policy. GitHub Actions now has the permission to write the files to your AWS S3 bucket. You will use these values in your workflow.
- Either from your local laptop or any terminal create the following directory structure and files and copy paste the code given below to your
node.js.ymland edit the YOUR-BUCKET-NAME to your respective S3 bucket created earlier
.github
└── workflows
└── node.js.yml# This workflow will do a clean installation of node dependencies, cache/restore them, build the source code and run tests across different versions of node
# For more information see: https://docs.github.com/en/actions/automating-builds-and-tests/building-and-testing-nodejs
name: Node.js CI
on:
push:
branches: [ "main" ]
pull_request:
branches: [ "main" ]
jobs:
build:
runs-on: ubuntu-latest
strategy:
matrix:
node-version: [18.x]
steps:
- uses: actions/checkout@v3
- name: Use Node.js ${{ matrix.node-version }}
uses: actions/setup-node@v3
with:
node-version: ${{ matrix.node-version }}
cache: 'npm'
- run: npm install
- run: npm run build
- name: Configure AWS Credentials
uses: aws-actions/configure-aws-credentials@v1
with:
aws-access-key-id: ${{ secrets.AWS_ACCESS_KEY_ID }}
aws-secret-access-key: ${{ secrets.AWS_SECRET_ACCESS_KEY }}
aws-region: ap-south-1
- name: Deploy static site to S3 bucket
run: aws s3 sync ./build/ ${{ secrets.AWS_S3_BUCKET_NAME }} --delete- Now you commit your changes
git add . && git commit -m "added github actions"and pushgit pushthis to your repository. Once the change is pushed goto yourActionstab on the repository and see the magic happening.
🎤 drop! You just published a static website using devops automated pipeline 😃
Power of DevOps
You just experienced the power of devops and how easy it is to publish your changes and not to worry copying files to your destination. You can now focus on just the application functionality